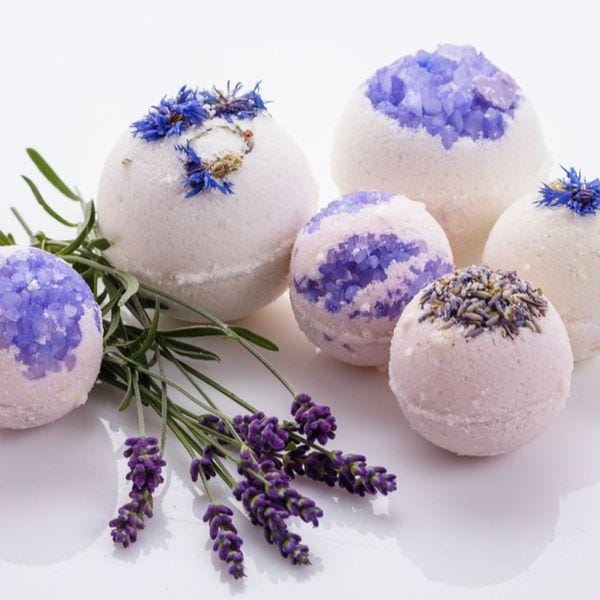

How to Make Bath Bombs
When it comes to bath time, adults and kids can both agree on adding a bit of fun and relaxation with bath bombs and bath fizzies. From fun surprise fizzies to luxurious, herb- and essential oil-scented bath bombs to soothe your senses and pamper your skin, our easy DIY bath bomb and bath fizzies recipe with many variations is great for beginners and kids.
Bath bombs serve as a fun self-indulgence as well as an excellent gift. Bath fizzies and bath bombs are also easy to make, so why spend as much as $9 for one when you can make them yourself?
Wait, back up… What is a bath bomb, anyway?
Despite the name, bath bombs do not actually explode in the tub. Instead, they slowly fizz away when thrown in warm bath water. This is due to a reaction caused by citric acid and baking soda (sodium bicarbonate) once they’re exposed to water, H2O. As the bath bomb “detonates,” it releases its fragrance, essential oils, herbs, etc. into the bath water.
It’s easy to customize your bath bombs with essential oils, herbs, flowers, skin oils and butters, colorants, and even fun bath toys. Some bath bombs and fizzies can contain Epsom salt or Himalayan sea salt to help pamper skin and muscles. In our recipe, all of these powdery ingredients bind together due to coconut oil, which also helps nourish and pamper the skin. Some bath bombs may also contain natural or artificial colorants, which can add an extra dimension to the bath bomb fizz (more on that later), but adding colorant is optional.
Pro tip: Himalayan sea salt is a great way to add a natural, soft pink color to your bath bombs. Rose petals, lavender buds, cornflower (bachelor’s button), and calendula are also great ways to add color and texture to your bath bombs and your bath.
Where do I get all the materials for a bath bomb?
You can get all the ingredients you need right here at Swanson (see links below too), or at your local grocery or health food store.
You can find bath bomb molds on Amazon, Etsy or other stores that sell soapmaking supplies. Some will have a section specifically for bath bombs or bath fizzies, whereas others will group them with soap molds. Soap molds do work for bath bombs, and you can test out a variety of shapes and sizes to make the perfect DIY bath bombs. Heart-shaped molds, butterfly molds, apple molds, and star mold are popular for creating bath bomb gifts for teachers, birthday parties and more.
How do you make homemade bath bombs?
We’ve updated our recipe to help you create crumble-free bath bombs. If you’re a fan of the old Swanson bath bomb recipe, scroll down to the end of the post where you will find it.
How to Make Bath Bombs: a DIY Recipe
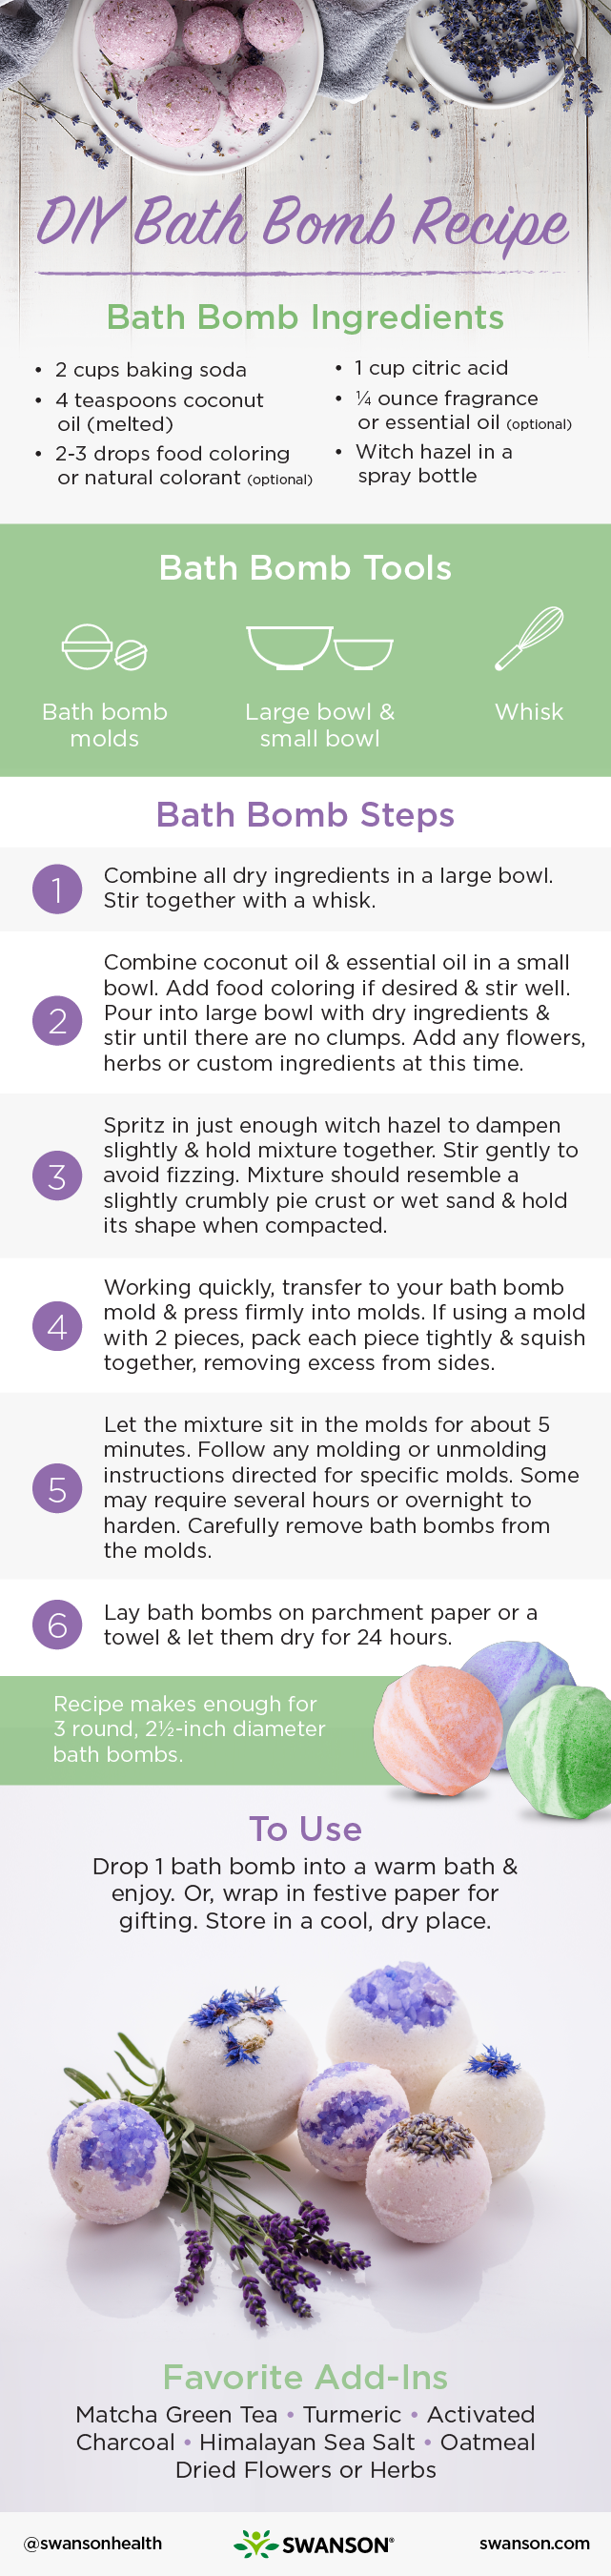
- 2 cups baking soda
- 1 cup citric acid
- 4 teaspoons coconut oil (melted)
- ¼ ounce fragrance or essential oil (optional)**
- 2-3 drops food coloring or natural colorant (optional)
- witch hazel in a spray bottle
Bath Bomb Tools:
- Bath bomb molds
- Large bowl & small bowl
- Whisk
Bath Bomb Steps:
- Combine all dry ingredients in a large bowl. Stir together with a whisk.
- Combine coconut oil and essential oil in a small bowl. Add food coloring (if using) and stir to combine. Pour mixture into large bowl. Stir until ingredients are thoroughly combined and there are no clumps in the mixture. Add in any flowers, herbs or other custom ingredients at this time.
- Spritz in witch hazel, using just enough to hold mixture together and slightly dampen the mixture. Stir gently to prevent mixture from fizzing up. Mixture should resemble a dry, or slightly crumbly pie crust or wet sand and hold its shape when compacted or squeezed between your fingers and palm.
- Working quickly, transfer mixture to bath bomb mold, pressing mixture firmly into molds. If using a mold with 2 pieces, such as a round mold, pack each piece tightly with mixture and then squish pieces together, removing any excess from the sides. Pro tip: If you are adding in any herbs or flowers to the top of the bath bomb, place a few petals or leaves in the bottom of the bath bomb mold before adding the mixture to the mold.
- Let the mixture sit in the molds for about five minutes. Follow any molding and unmolding instructions as directed for specific molds. Some molds may require several hours or overnight to allow mixture to harden. Carefully remove bath bombs from the molds.
- Lay bath bombs on parchment paper or a towel and let them dry for 24 hours.
Recipe makes enough for 3 round, 2½-inch diameter bath bombs.
To Use: Drop bath bomb into a warm bath and enjoy. Or, wrap in festive paper for gifting. Store in a cool, dry place.
Simple, right? And so much fun!
The Best Bath Bomb Recipe Variations
Now for the really fun stuff. Bath bombs can be made into a variety of shapes, colors and sizes. The following are a few suggestions for inspiration.
Use More than One Color
Separate your bath bomb mixture into as many bowls as you want colors. Follow the rest of the recipe as directed. We love using matcha green tea, turmeric, activated charcoal, or Himalayan sea salt to add natural color to our bath bomb recipes.
Abstract — Randomly pack your bath bomb mold with different colors for a wild and fun look.
Stripes — Take turns packing your mixture with 2 or more colors for a stripe effect.
The Planet — This one’s a lot of fun to watch as the bath bomb fizzes away in the bath. It is also a little tricky to make since it’s built with an outside-in approach, meaning you’ll work from the edges inward. Start by thickly and evenly lining the edge of a round bath bomb mold with 1 color so it leaves a little hole in the middle. Then fill in the inside with another color for a “core.” Follow the rest of the recipe as directed.
The Natural — Pamper skin with antioxidant turmeric and activated charcoal. Divide mixture into 2 bowls. Use 1 teaspoon of turmeric to color half of mixture and 1 teaspoon activated charcoal (break open capsules and pour powder into mixture) to color the other half of the bath bomb mixture. Pack into molds in alternating layers. Follow the rest of the recipe as directed.
The Rose — Use a circle, rose or heart bath bomb mold. Add ½ cup of Himalayan sea salt to the basic DIY bath bomb mixture. For fragrance, use rose hip seed oil or essential oil rose absolute (¼ ounce). Before pressing mixture into molds, place a few rose petals in the bottom of the molds (this will give you rose petals on the top of the bath bomb once it’s out of the mold). These make the perfect DIY bath bomb gift for teachers, friends, Valentine’s Day or Sweetest Day. Follow the rest of the recipe as directed.
Winter Wonderland — Use a snowflake mold. Add ½ cup of Celtic Sea Salt Light Grey Coarse (or Celtic Sea Salt Fine Ground) and 2 tablespoons cornflower petals to the basic DIY bath bomb recipe. For essential oils fragrance, add seasonal favorites like sage or rosemary. Follow the rest of the recipe as directed.
Water Garden — Use circle bath bomb mold. In a small bowl, mix together the following dried flowers: 1 teaspoon of cornflowers, 1 teaspoon of rose petals, 1 teaspoon of lavender buds, and 1 teaspoon of chamomile flowers. Sprinkle mixed flower petals and buds into bottom of mold—about ½-1 teaspoon per mold. Add rose hip seed oil or lavender essential oil to the basic DIY bath bomb recipe as your fragrance. Follow the rest of the recipe as directed.
Vary Shape & Size
Round is the most common bath bomb shape, but why stop there? Search around on websites that sell bath bomb materials. You will find a variety of bath bomb molds that include flowers, hearts, snowflakes and even cupcakes!
Add Non-Fizzy Ingredients
Mixing flower petals into your bath bomb recipe won’t affect the consistency of the bath bomb, and they’ll create an amazing look in the bath. Just don’t let the petals go down the drain and clog your pipes when you’re done.
You can also add in more ingredients to pamper your skin and nourish your glow like chamomile (use whole flowers for a more botanical look or ground flowers in Swanson Chamomile capsules), oatmeal and green tea leaves or green matcha tea powder for an extra therapeutic boost. For kids, you can insert a small waterproof toy inside a bath bomb for a fun surprise.
How to Make Bath Bombs Without Citric Acid
Bath bombs without citric acid won’t be as fizzy, but this recipe will still be a hit, especially for those with skin sensitivity concerns or those looking for more kid-friendly bath bomb recipes.
- 1 cup baking soda
- ½ cup cornstarch
- ½ cup Epsom salts
- 4 tablespoons cream of tartar
- 4 teaspoons coconut oil (melted)
- ¼ ounce fragrance or essential oil (optional)**
- 2-3 drops food coloring or natural colorant (optional)
- witch hazel in a spray bottle
Follow the steps listed for the basic DIY Bath Bomb Recipe above.
Swanson DIY Bath Bombs Recipe
Bath Bomb Ingredients:
- ½ cup baking soda
- ¼ cup cornstarch
- ¼ cup citric acid
- 3-4 teaspoons coconut oil
- 1-2 teaspoons water
- 1 teaspoon essential oil
- few drops food coloring (optional)
Bath Bomb Steps:
- Combine all dry ingredients in a bowl. Stir together with a whisk.
- Add coconut oil, essential oil and food coloring (if using). Stir until ingredients are thoroughly combined.
- When adding water, do it slowly and add only as much as needed because the mixture will fizz upon exposure to water. Stir vigorously to reduce fizzing while adding water.
- When the mixture is wet enough to stick together in clumps, press mixture firmly into molds until molds are filled. If using a mold with 2 pieces, such as a round mold, squish pieces together and remove any excess from the sides.
- Let the mixture sit in the molds for five minutes, then carefully remove bath bombs from the molds.
- Lay bath bombs on parchment paper or a towel and let them dry for 24 hours.
Recipe makes enough for 2 round 2.5 inch diameter bath bombs.
The possibilities for creating your own bath bomb are limited only by the imagination. Please share in the comments if you’ve made your own bath bombs and tell us about your favorite DIY bath bomb and bath fizzy creations!
If you would like more information on essential oils or aromatherapy, check out Essential Oils and Aromatherapy: Beginner's Guide to Using Essential Oils and Essential Oils Beauty Tip: Choose the Right Carrier Oil.
Looking for more ways to add stress reduction and relaxation to your daily wellness routine? Read Say Oooom: Six Tips to Help Your Reduce Stress and Relax.

About Lindsey Toth, MS, RD
Lindsey is a nationally recognized registered dietitian and nutritionist with a soft spot for pie. She empowers people to take charge of their health by finding the balance between the pleasure and nourishment in food. Her philosophy is that you should take care of your body because it’s the only permanent home you have. It’s what inspired her to pursue a career in nutrition.
**We recommend handling essential oils with care and following any usage, safety guidelines and drug interaction warnings on the label. Testing for skin sensitivity is important before using, and we recommend people consult a doctor, especially if they are pregnant, to discuss what is safe for their individual needs.
*These statements have not been evaluated by the Food and Drug Administration. These products are not intended to diagnose, treat, cure, or prevent any disease.